9. Tutorials
9.1. What is it?
iCOMIC (Integrating Context Of Mutation In Cancer) is an open-source, standalone tool for genomic data analysis characterized by a Python-based Graphical User Interface, automated bioinformatics pipelines for analyzing Whole genome/exome and transcriptomic data along with Machine Learning tools, cTaG and NBDriver for cancer related data analysis. It serves as a point and click application facilitating genomic data analysis accessible to researchers with minimal programming expertise. iCOMIC takes in raw sequencing data in FASTQ format as an input, and outputs insightful statistics on the nature of the data. iCOMIC toolkit is embedded in Snakemake, a workflow management system and is characterized by a user-friendly GUI built using PyQt5 which improves its ease of access. The toolkit features many independent core workflows in both whole genomic and transcriptomic data analysis pipelines.
9.2. Prerequisites:
- Linux/Windows/Mac (MacOS v10.15.5 or above) platform
- Python 3.6 and above
- Miniconda
- iCOMIC package downloaded from GitHub
9.3. Conda Installation
The entire source code for the tool is available at this link
Create an environment and install the dependencies associated with iCOMIC by using the following command:
$ cd iCOMIC-main
$ conda env create -f icomic_env.yml  #for Linux users
$ conda env create -f icomic_env_mac.yml  #for MacOS users
$ conda activate icomic_env
$ pip install -e icomic #for the first time only
$ cd icomic #path/to/icomic directory
$ icomic
$ conda deactivate #after completing the analysis
9.4. Testing
The user can test the iCOMIC pipeline using the demo data, reference genome, known variants file, annotation file to run DNA-Seq, RNA-Seq, cTaG and NBDriver provided in this link.
The path to the respective samples are:
- DNA samples - dna_germline_samples or dna_somatic_samples
- RNA samples - rna_samples
- cTaG - variants.maf
- NBDriver - NBDriver_vcf.vcf
After downloading and creating the environment to run iCOMIC, open iCOMIC GUI by simply typing ‘icomic’ in the terminal and then follow the steps provided below:
DNA-Seq
Germline variant calling
- Click upload from Table
- Sample table path - dna_germline_samples/unit_samples.tsv
NOTE:Edit the paths inside the tsv file before uploading.
- Reference Genome path - genome.chr21.fa
- Reference Known Variant path - dbsnp.vcf.gz
- Enter Threads and proceed with the steps given in the section 9.5
Somatic variant calling
- Click upload from Folder
- Sample Folder path - dna_somatic_samples
- Reference Genome path - hg38.fa
- Reference Known Variant path - clinvar_20191231.vcf.gz
- Enter Threads and proceed with the steps given in the section 9.5
RNA-Seq
- click upload from Folder
- Sample Folder path - rna_samples
- Fasta File path - hg38.chr22.fa
- Annotated File path - chr22_refGene.gtf
- Enter Threads and proceed with the steps given in the section 9.5
cTaG
- Path to MAF file - variants.maf
- Enter Parameters and click Run
Refer section 9.5 for more details
NBDriver
In order to run NBDriver, the user needs to download the hg19 reference genome from this link and put it in the "/iCOMIC/NBDriver_iCOMIC/" directory
- Path to VCF file - NBDriver_vcf.vcf
- Click Run
Refer section 9.5 for more details
9.5. Analysis quick guide
9.5.1 Launching the wrapper
iCOMIC can be launched using a simple command in the terminal.
$ icomic
9.5.2 Running iCOMIC: A quick walkthrough
Here is a typical set of actions to run iCOMIC pipelines:
- Select a pipeline
- Choose the mode of input
- Input the required data fields
- Proceed to the next tab if you want to skip Quality Check
- Or click on the
Quality Control Resultsbutton to view a consolidated MultiQC report of Quality statistics - Check
yesif you want to do trimming and also mention the additional parameters as per requirement - Tool for Quality Control: FastQC
- Tool for trimming the reads: Cutadapt
- Choose the tools of interest from
Tool selectiontab and set the parameters as required - For the choice of aligner, the corresponding genome index file needs to be uploaded if available, or the user can generate the index file using the Generate Index button
- Click
Runon the next tab to run the analysis - Once the analysis is completed, the
Resultstab will be opened - DNA-Seq results include a MultiQC report comprising the statistics of the entire analysis, a file consisting of the variants called and the corresponding annotated variant file
- Results for RNA-Seq analysis include multiQC analysis statistics, R plots such as MA plot, Heatmap, PCA plot and box plot and list of differentially expressed genes
- Proceed to cTaG/NBDriver tab for further analysis if needed
9.5.3 Adding samples: Method one
iCOMIC accepts input information in two different modes. In the first method, the user can feed the path to a folder containing raw fastq files. For the direct upload of a sample folder, the folder should contain only the samples and the sample file names should be in a specific format:
{sample_name}_{condition}_Rep{replicate_number}_R{1 / 2}.fastq
{sample_name}should be replaced with the sample name{condition}should be replaced with the nature of the sample, normal or tumor. If you are using a germline variant calling pipeline, the condition should be normal for all the samples{replicate_number}should be replaced by the number of replicate- If the sample is paired end,
{1 / 2}should be replaced by 1 or 2 accordingly for forward and reverse sequences. If the sample is single end, {1 / 2} can be replaced by 1
9.5.4 Adding samples: Method two
The user can provide a table consolidating particulars of raw data. The sample information should be given in a tab delimited file with a header row. The Column names should be:
- Sample : The Sample name
- Unit : The number of replicates
- Condition : Nature of the sample, normal or tumor
- fq1 : The path of Read 1
- fq2 : Path of Read 2, if you are working with single-end reads only, the ‘fq2’ column can be left blank
9.5.5 Adding samples: specifying DNA-seq workflow
The significant obligation is raw fastq files which can either be single-end or paired-end. Fastq read details can be specified in two different methods, either by uploading a folder containing the reads or using a tab-separated file describing the reads as specified in the previous sections. Other input requirements and the file specifications are as mentioned:
- Samples Folder : Path to the folder containing samples satisfying the conditions mentioned in section 3
- Samples Table : Path to the tsv file generated according to instructions in section 4 as an alternative to Samples folder
- Reference Genome : Path to the reference genome. The file should have an extension .fa
- Reference Known Variant : Path to the reference known variants file. The file should be a bgzipped vcf
- Maximum threads : The maximum number of threads that can be used for running each tool. Once all the fields are filled, you can proceed to the Quality Control tab using the next button.
 Figure 1: Input tab of DNA Seq pipeline
9.5.6 Adding samples: specifying RNA-seq workflow
Similar to the DNA-Seq pipeline, the major requirement here is also raw fastq files, either single-end or paired-end. Fastq read details can be specified in two different methods, either by uploading a folder containing the reads or using a tab-separated file describing the reads, as specified in the previous sections. Other input requirements and file specifications for RNA-seq workflow are mentioned below.
- Samples Folder : Path to the folder containing samples satisfying the conditions mentioned in section 3
- Samples Table : Path to the tsv file generated according to instructions in section 4 as an alternative to Samples folder
- Fasta file : Path to the reference genome. The file should have an extension .fa
- Annotated file : Path to the gtf annotation file
- Maximum threads : The maximum number of threads that can be used for running each tool. Once all the fields are filled, users can proceed to the Quality Control tab using the next button.
 Figure 2: Input tab of RNA Seq pipeline
9.5.7 Review of Sample quality
In the Quality Control widget, you can examine the quality of your samples for analysis by clicking on the Quality Control Results button. The tool MultiQC provides a consolidated report of Quality statistics generated by FastQC for all the samples. Additionally, iCOMIC permits you to trim the reads using Cutadapt if required.
However, it is also possible to move ahead without going through the Quality Check process. The Quality Control widget is more or less identical for DNA and RNA seq workflows.
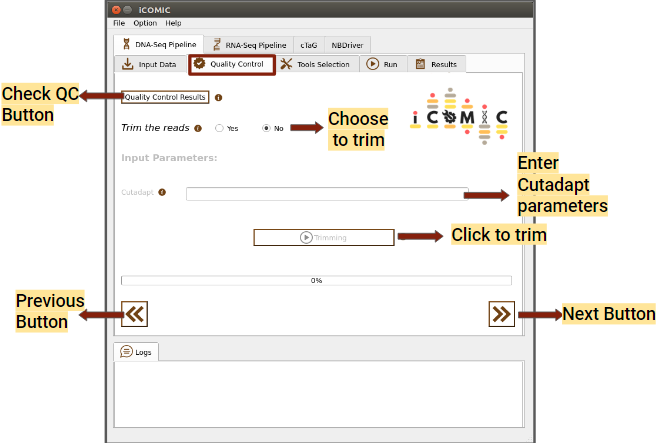 Figure 3: Quality Control tab of DNA Seq pipeline
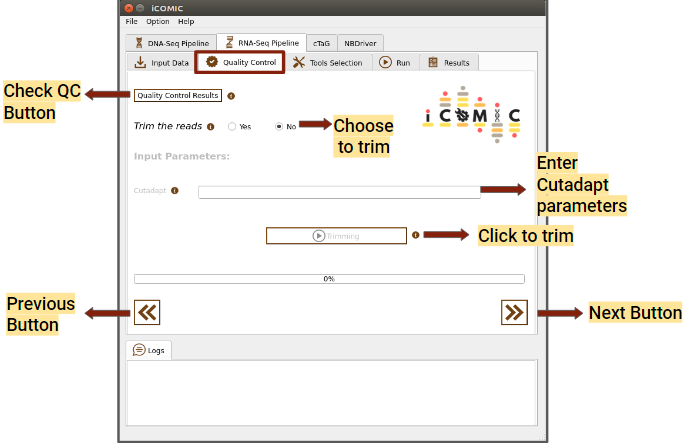 Figure 4: Quality Control tab of RNA Seq pipeline
9.5.8 Specifying analysis settings DNA seq
DNA-Seq constitutes the Whole Genome/Exome Sequencing data analysis pipeline which permits the user to call variants from the input samples and annotate them. iCOMIC integrates a combination of 3 aligners, 5 variant callers and 2 annotators along with the tools for Quality control. The tool MultiQC is incorporated to render comprehensive analysis statistics.
In the tool selection widget, you will be asked to choose your desired set of tools for analysis.
- Aligner
You can choose a software for sequence alignment from the drop down menu. You will also need to input the genome index corresponding to the choice of aligner. iCOMIC allows you to generate the required index using the Generate index button. One will have the permission to change the values for the mandatory parameters displayed. Moreover, if you are an expert bioinformatician, iCOMIC allows you to play around with the advanced parameters. Clicking on the Advanced button would open a pop-up of all the parameters associated with a tool.
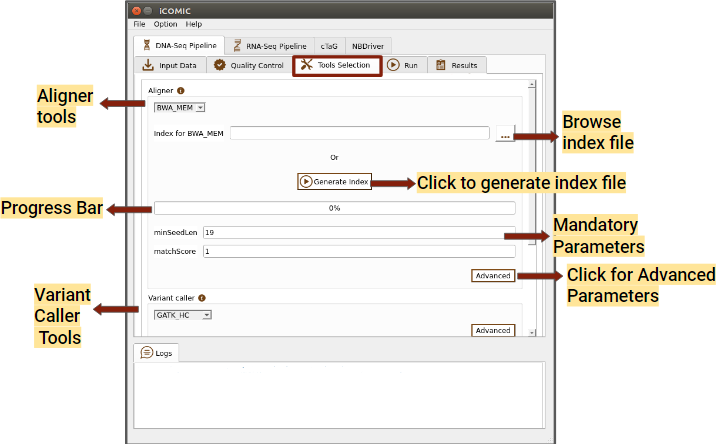 Figure 5: Tools tab of DNA Seq pipeline
- Variant Caller
This section permits you to choose a variant caller from the set of tools integrated. If the input sample is normal-tumor specific, then only those tools which call variants comparing the normal and tumor samples will be displayed. On the other hand, if you want to call variants corresponding to the reference genome, variant callers of that type would be displayed. iCOMIC allows you to set mandatory as well as advanced parameters for the selected tool.
- Annotator
This section allows you to choose a tool for annotating your called variants and specify the parameters.
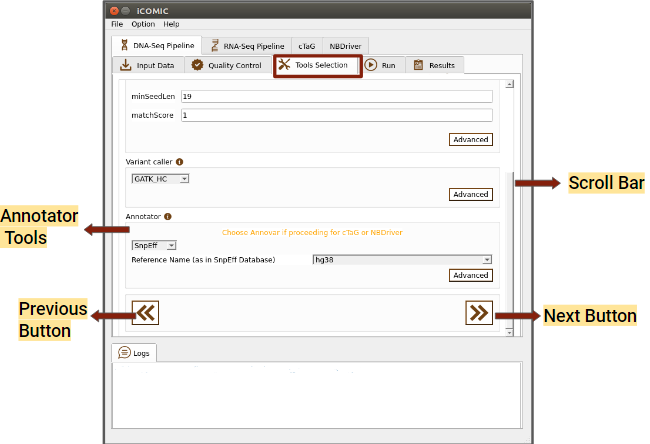 Figure 6: Tools tab of DNA Seq pipeline
9.5.9 Setting up differential gene expression analysis
RNA-Seq part allows you to identify the differentially expressed genes from RNA Sequencing data. iCOMIC integrates a combination of 2 aligners, 2 expression modellers and 2 differential expression tools along with the tools for Quality control. The tool MultiQC is incorporated to render comprehensive analysis statistics.
Available pipelines:
- HISAT2-StringTie-ballgown
- STAR-StringTie-ballgown
- HISAT2-HTSeq-DESeq2
- STAR-HTSeq-DESeq2
- Aligner
You can choose a software for sequence alignment from the drop down menu. You will also need to input the genome index corresponding to the choice of aligner. No worries! iCOMIC allows you to generate the required index using the Generate index button. One will have the permission to change the values for the mandatory parameters displayed. Moreover, if you are an expert bioinformatician, iCOMIC allows you to play around with the advanced parameters. Clicking on the Advanced button would open a pop-up of all the parameters associated with a tool.
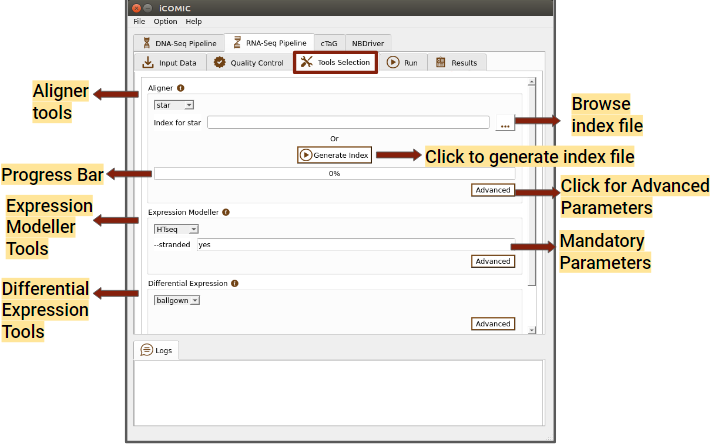 Figure 7: Tools tab of RNA Seq pipeline
- Expression Modeller
This section allows you to choose an expression modeller from the integrated list of tools for counting the reads with the help of annotation file. Users will also have the freedom to set parameters corresponding to the tool.
- Differential Expression tool
Here you can choose a tool for quantifying differential expression and can also set parameters.
 Figure 8: Tools tab of RNA Seq pipeline
9.5.10 Submitting the analysis
The Run tab consists of a Run button to initialize and proceed with the analysis. Progress bar present in the tab allows you to examine the extent to which the process has been completed.
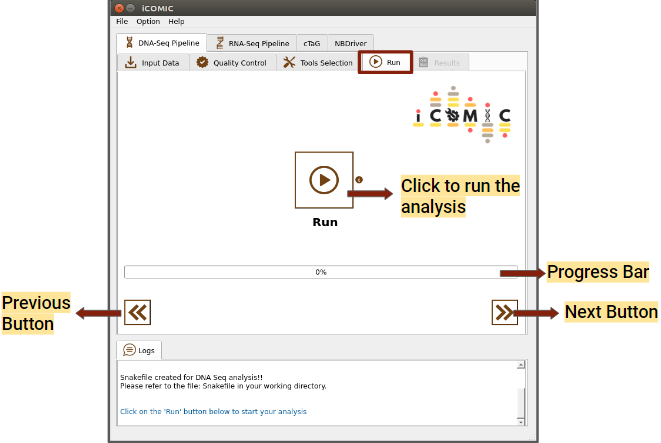 Figure 9: Run tab of DNA Seq pipeline
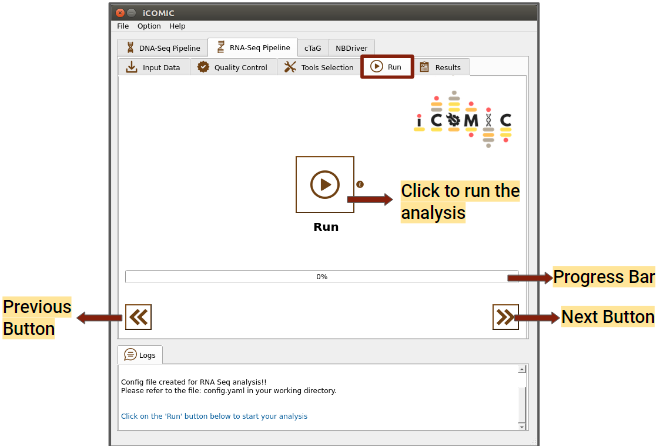 Figure 10: Run tab of RNA Seq pipeline
9.5.11 Retrieving the data
Once the analysis is completed, iCOMIC will automatically move on to the Results tab which displays three major results.
- DNA-Seq
The results displayed for DNA seq workflow are listed below.
- Analysis Statistics
Displays a MultiQC consolidated report of overall analysis statistics. This includes FastQC reports, Alignment statistics and variant statistics.
- Variants called
On clicking this button a pop up with the vcf file of variants called will be displayed.
- Annotated variants
Displays the annotated vcf file
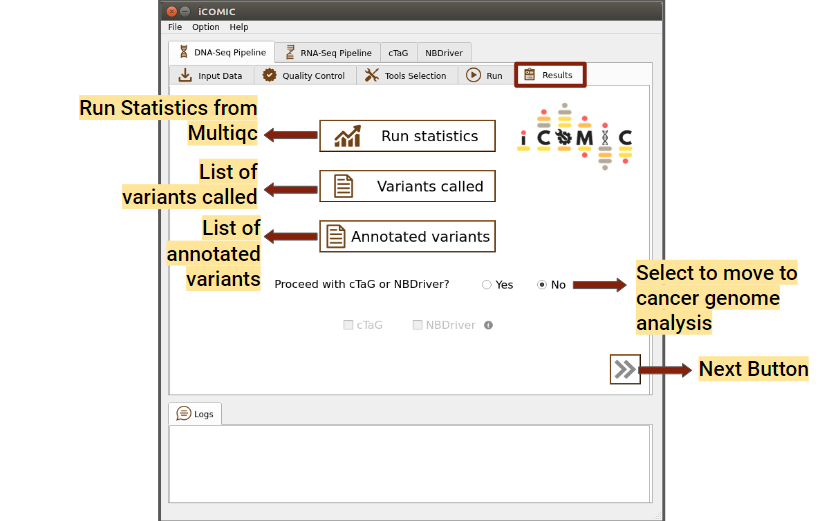 Figure 11: Results tab of DNA Seq pipeline
- RNA-seq
The results displayed for DNA seq workflow are listed below.
- Analysis Statistics
Displays a MultiQC consolidated report of overall analysis statistics. This includes FastQC reports and Alignment statistics
- Differentially Expressed Genes
On clicking this button a pop up with the list of differentially expressed genes will be displayed.
- Plots
Displays differentially expressed genes in R plots such as MA plot, Heatmap, PCA plot and box plot.
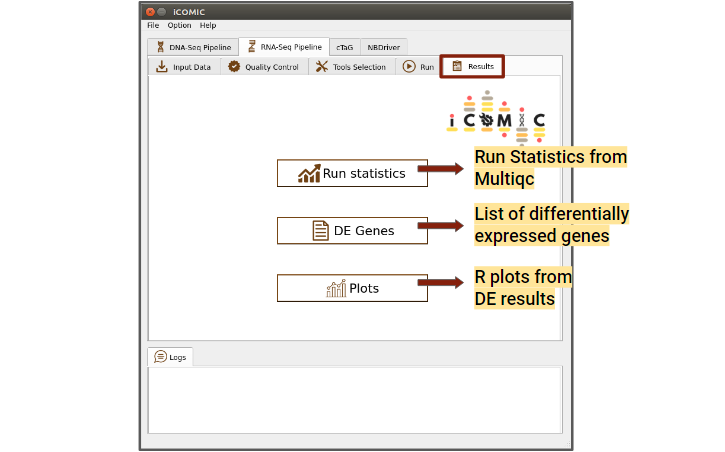 Figure 12: Results tab of RNA Seq pipeline
9.5.12 Analysis with BAM input
iCOMIC allows the user to start the analysis with aligned BAM files. For running iCOMIC with BAM files as input, the files should be sorted and stored in a folder named ‘results_dna/mapped’ or ‘results/mapped’ in the case DNA seq and RNA seq workflows respectively. The BAM files should be named in the format {sample}-{unit}-{condition}.sorted.bam. It is advised that while choosing this approach, the input is provided as a table. The sample information should be specified as mentioned in section 3 with fq1 and fq2 columns empty.
9.5.13 Running cTaG
cTaG (classify TSG and OG) is a tool used to identify tumour suppressor genes (TSGs) and oncogenes (OGs) using somatic mutation data. A maf file is required to run the cTaG tool, it can either be generated from the DNA-Seq output vcf file in the results tab or browsed locally. Added to that, you can mention the parameters required to run the cTag in the parameters option provided.You can click on the run button to initialize the analysis, once the necessary files have been uploaded. Once the analysis is completed, you can click on the Results button to view the results.
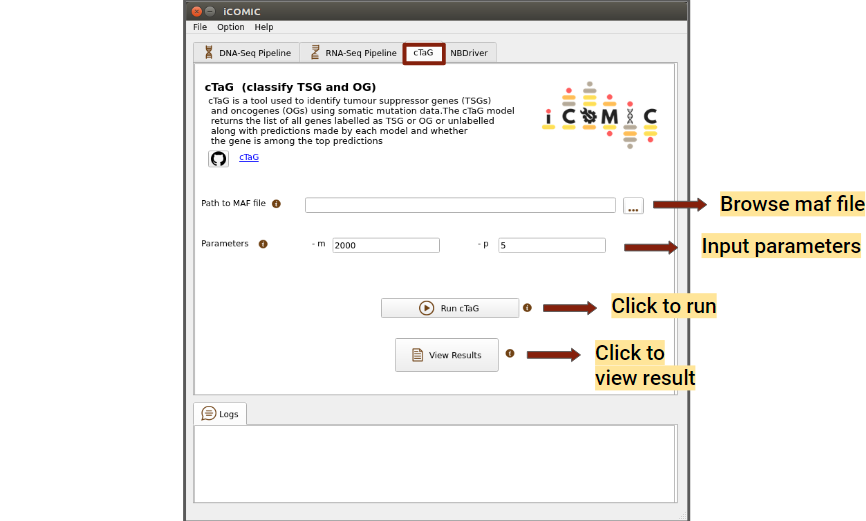 Figure 13: cTaG tab
9.5.14 Running NBDriver
NBDriver (NEIGHBORHOOD Driver) is a tool used to differentiate between driver and passenger mutations. A vcf file is required to run NBDriver, it can either be browsed from the DNA-Seq output directory or locally. In order to run NBDriver, the user needs to download the hg19 reference genome from this link and put it in the "/icomic/NBDriver_iCOMIC/" directory. You can click on the run button to initialize the analysis, once the necessary files have been uploaded. Once the analysis is completed, you can click on the Results button to view the results.
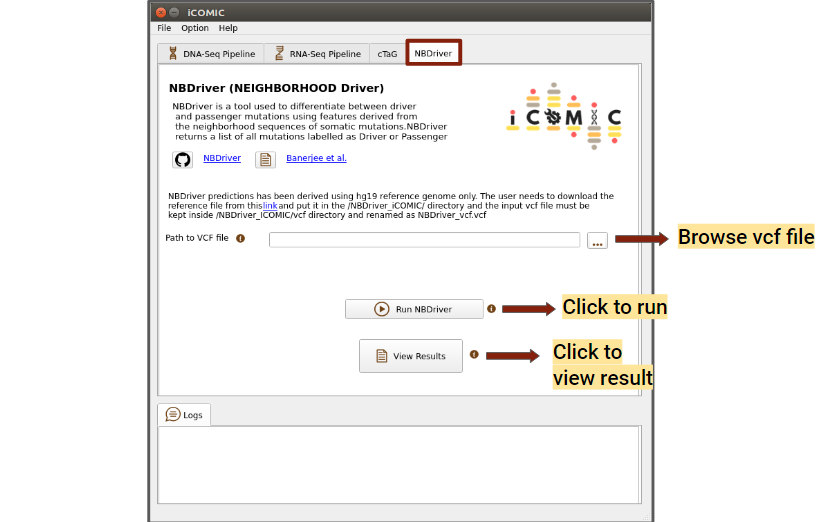 Figure 14: NBDriver tab
9.6 Retrieving logs
The Logs tab at the bottom of each section in the GUI displays the commands executed by the user. Seperate log for each tools are available inside logs folder created during the analysis. The user can check the log files at any time.